Chapter 14: Checkpointing
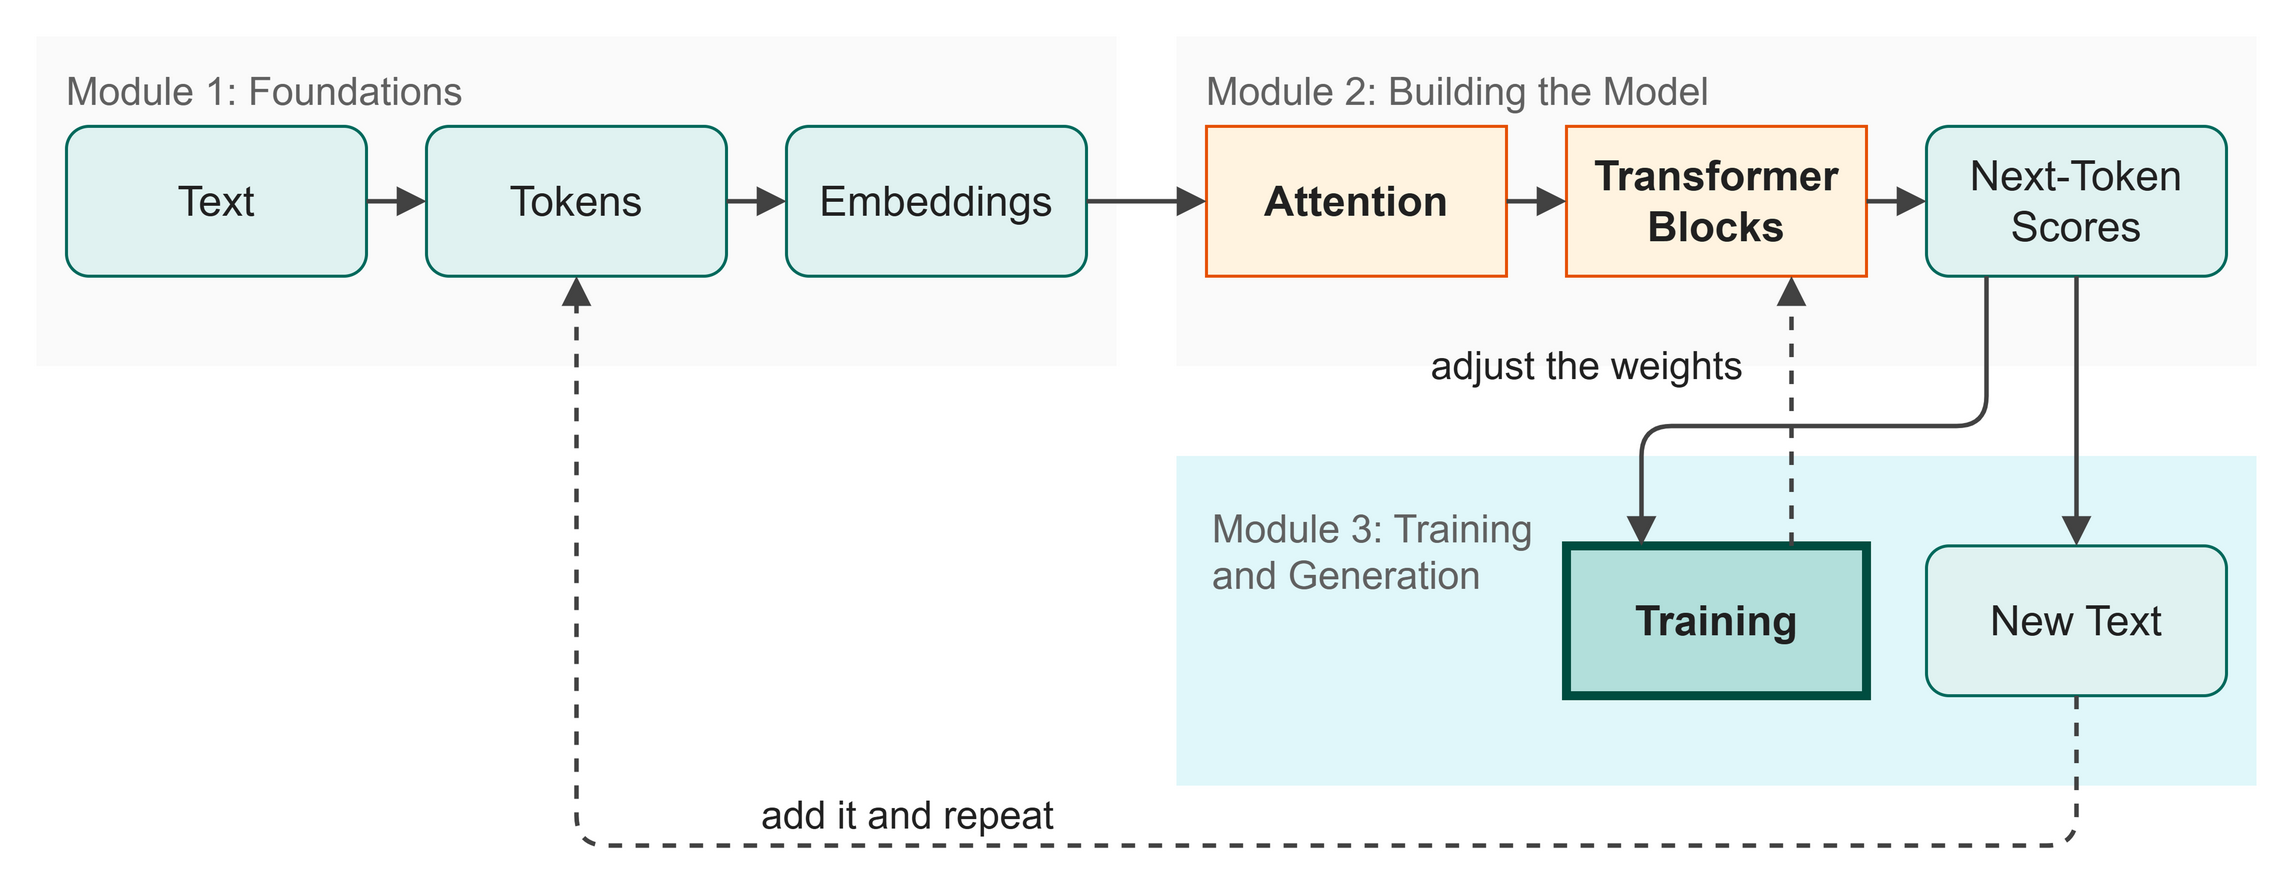 Figure 14.1: Where we are: we have trained the model and now we save its weights.
Training a language model takes time. Once the model learns from the data, you need to save its knowledge so you can use it later without retraining. In this chapter you will:
- Save a trained model to a file.
- Load a saved model back into memory.
- Switch the model from training mode to evaluation mode.
Words to Know
- Checkpoint: a file that saves a model at one point in training, with its learned weights and its configuration (how it is built).
- State Dict: a PyTorch dictionary (a lookup table) that pairs each layer of the model with its learned weights.
- Dropout: A technique that randomly turns off some neurons (small parts of the model) during training, so it cannot simply memorize the data.
Theory
The Checkpoint File
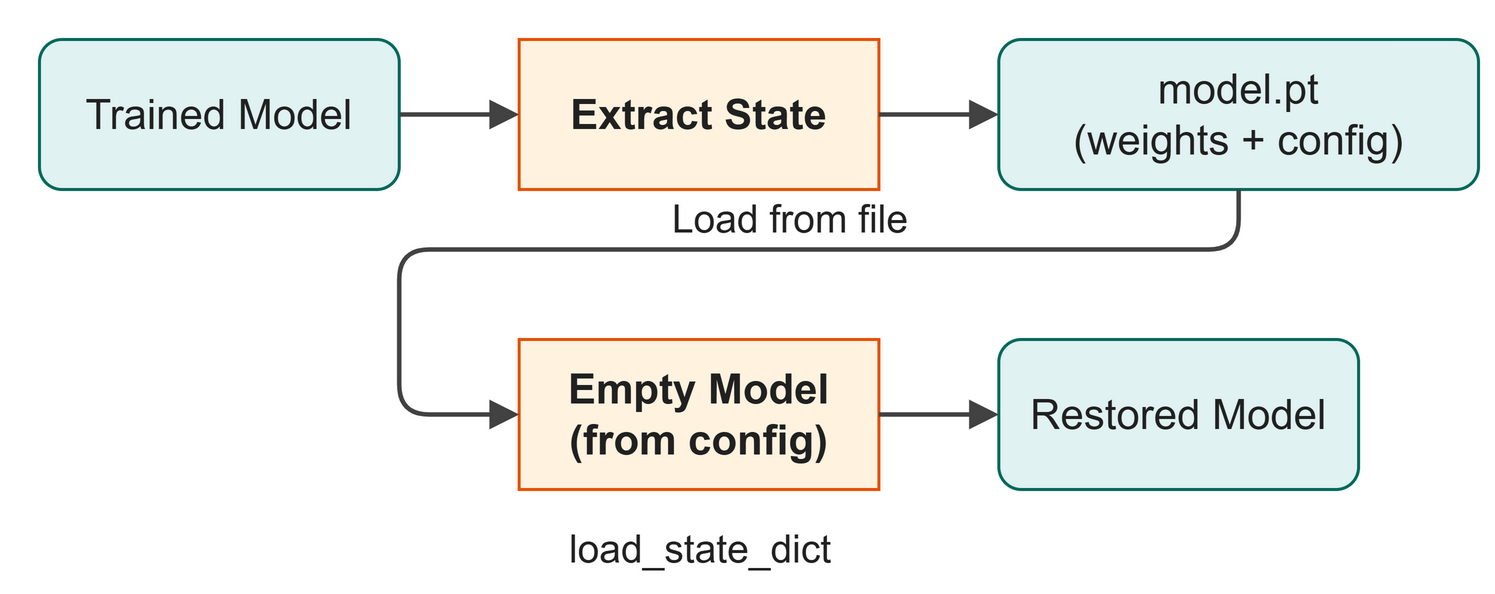 Figure 14.2: The save and load round trip: the model's structure and its learned weights are both stored in the checkpoint.
A checkpoint is the model's save file. When you train a model, you adjust its weights (the parameters). These learned parameters are stored in a lookup table that PyTorch calls a state_dict (short for state dictionary), where each layer's name sits next to that layer's weights.
However, the weights alone are not enough. If you close your program and come back tomorrow, PyTorch will not know how many layers or attention heads your model has. To bring the model back to life, you must save both its configuration (the architecture skeleton) and its state dictionary (the learned weights). We also save the current training step and validation loss so we know how well the model performed.
Restoring the Model
Loading a checkpoint happens in three steps:
- Load the saved dictionary from the file on disk.
- Build an empty model using the saved configuration.
- Pour the saved weights into the empty model.
Once the model is loaded, you must call model.eval(). During training, neural networks often use a technique called dropout, which randomly turns off some neurons to prevent the model from memorizing the data. Calling model.eval() turns off dropout, so that all neurons are active and the same input always gives the same scores (the model is deterministic).
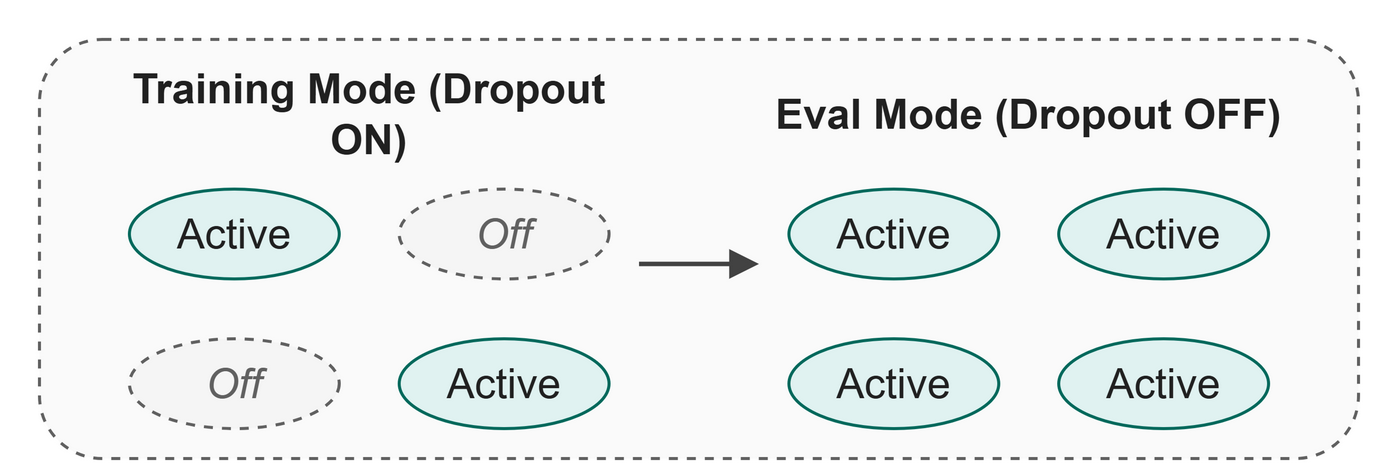 Figure 14.3: In evaluation mode, all neurons are active and the model is ready to generate text deterministically.
On the "where we are" map, saving the checkpoint captures the model after the training loop, preparing it to generate new text in the final stage.
In Business
Think of our house-style assistant. The training process analyzed your company's archive to learn its voice, and if the server restarts, you don't want to re-read the entire archive. A checkpoint saves that learned company voice to a tiny file that you can load instantly on any machine.
Code
We use the PyTorch torch.load() function to read our checkpoint file, and model.load_state_dict() to apply the weights.
Running the script loads the checkpoint created at the end of the previous chapter.
$ python src/ch13_checkpoint.py
--- 2. Load the checkpoint ---
Loading checkpoint from: checkpoints/model.pt
  Trained for  : 3000 steps
  Val loss     : 1.7228
  Model config : 4 layers, 128 embd, 4 heads

--- 3. Rebuild the model from the checkpoint ---

Model rebuilt successfully: 824,832 parameters loaded

--- 4. Verify the model works ---
Input shape : torch.Size([1, 10])
Output shape: torch.Size([1, 10, 65])   (looks good!)

--- 5. Show checkpoint file size ---

Checkpoint file size: 4.18 MB
(Small enough to share by email!)

Checkpointing done! Ready for Chapter 15.
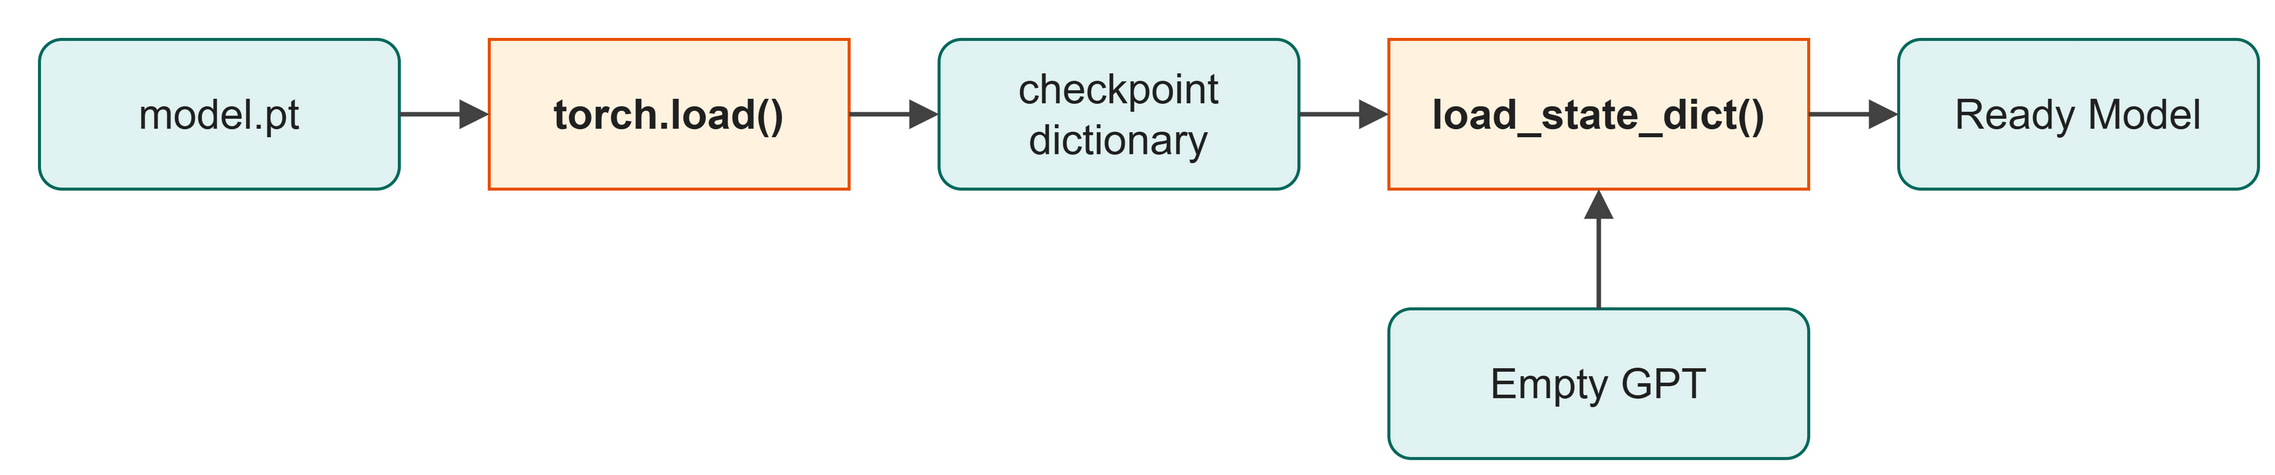 Figure 14.4: How the checkpoint loading code flows: from file to ready model.
What just happened:
- Line 1 loaded the checkpoint
model.ptfrom disk. - Line 8 built an empty
GPTmodel using the loaded configuration. - Line 9 populated the model with the 824,832 learned parameters.
- Line 12 switched the model to evaluation mode.
- We verified the checkpoint file is tiny (just over 4 megabytes).
Shape Check
Table 14.1 lists the tensor shapes when verifying the loaded model.
Table 14.1: Input and output shapes for the restored model.
| Tensor | Shape | What it means |
|---|---|---|
dummy_ids |
[1, 10] |
1 sequence of 10 token IDs. |
logits |
[1, 10, 65] |
65 vocabulary scores for each of the 10 positions. |
Try It
Try It
You can look inside the checkpoint with a small script that loads the file. The repository already has one:
| src/examples/ch14_inspect_checkpoint.py (excerpt) | |
|---|---|
Lines 9 and 10 print the keys and the training step from the loaded checkpoint dictionary.
Key Takeaways
- A checkpoint saves the model's configuration and learned weights to a file.
- You rebuild the model by creating an empty network with the configuration, then loading the weights with
load_state_dict. - Always call
model.eval()after loading a model to turn off training features like dropout. - A model with 825,000 parameters takes up only about 4 MB of disk space.
Check Your Understanding
- Why do we need to save the model's configuration in the checkpoint along with the weights?
- What happens if you forget to call
model.eval()before generating text? - What PyTorch function do we use to apply the saved weights to the newly built model?
Assignment
Assignment 14: Open the save file
About 15 minutes. You change one word and write no new code. Work in this chapter's Colab notebook or on your own laptop.
- Run it. Run
src/examples/ch14_inspect_checkpoint.pyas it is. Copy the two lines it prints. - Change one word. Find the line
print("Training step:", checkpoint.get("step")). The word insideget(...)names the item the script takes out of the file. Insideget(...), change"step"to"gpt_cfg", another name from the list of keys. Keep the quotation marks, and run the script again. - Compare. The label still says
Training step:, but what follows it now? Which of its numbers match the lineModel config : 4 layers, 128 embd, 4 headsfrom this chapter's run? Which other numbers do you recognize from earlier chapters? - Explain it. In two or three sentences a manager could follow, say why the save file must hold this configuration and not only the learned weights.
Hand in: both outputs, your answers to step 3, and your sentences.
Further Reading
The library you are typing into. The design argument behind the tool this book uses: write the model as ordinary Python that runs line by line, so you can print a tensor or stop in a debugger, and still get the speed of compiled code underneath. It is the reason the code in this book can be read top to bottom and still trains a real model.
Paszke, A., Gross, S., Massa, F., Lerer, A., Bradbury, J., Chanan, G., Killeen, T., Lin, Z., Gimelshein, N., Antiga, L., Desmaison, A., Köpf, A., Yang, E., DeVito, Z., Raison, M., Tejani, A., Chilamkurthy, S., Steiner, B., Fang, L., ... Chintala, S. (2019). PyTorch: An imperative style, high-performance deep learning library (arXiv:1912.01703). arXiv. https://doi.org/10.48550/arXiv.1912.01703
Next up: Chapter 15: Greedy and Sampling